Good day all people may identify is Robin Lewis And this is my new bassinet cut down co-sleeper for my first youngster coming along later this year it is made using Tasmanian o.K.And Meranti Let me show you ways I put it collectively however before getting started with the video I might similar to to ask that if you are a subscriber of this channel that you just go and have a appear to make certain that you’re sincerely subscribed, and if you want to be certain that you get Notifications right away that the Bell icon is ticked. I’ve had a couple of people just lately announcing that they had been simply randomly unsubscribed from my channel So I might expect should you might go and have a look. Alright with that mentioned, let’s get on with the video As with every mission it began with me taking the measurements and striking them up on my chalkboard so they were continuously in sight and then I could separate the fabric that I desired to make use of in this case I was utilising a timber called Meranti and this was once a fairly low-grade timber sadly I was firstly going to use this timber for a reduce however I decided that was once some distance too gigantic and ways too much weight for this bushes so as a substitute I scaled it right down to the bassinet (cot/crib) I cut all the pieces to size utilising a stop block at any place I wanted to make repeat cuts This rather came in helpful for reducing the slats With all of the portions cut I would start marking out for the dowels I had three dowels on every end of the stiles and as soon as these had been marked.
I might take it over to the drill press when I had the entire holes drilled I used these dowels centre elements to mark the area of the dowels on the rails Squeezing the board’s together made a small indent eventually grain of the rails after which I would go back with a pencil and just add little dots so I did not lose the mark I observed the excellent approach to get a perpendicular hole through the bushes at these form of heights on the drill press is to use A velocity square, protecting it against the desk and the trees the following factor for me to do is take these rails and make some notches or some mortises in order that I can put the slats in going for walks by means of this fashion Now I’ve simply realized that I’ve kind of performed this slightly arse about face I rather should have put the slats in first and then work the stiles onto that, that approach I would Have extended the length of the stiiles and reduce them to dimension I’ve finished one.
I am aware of it works It simply signifies that I’ve got to be very careful about how much I take off on the shoulders so that every one of these inside lengths are the same. So it can be completed, however subsequent time I’m going to do the slats first. I consider that’d simply make existence a lot simpler To get the majority of the material out for these slats I started at the drill press then I took it over to my bench the place I would use a router with an aspect guide to make certain that I’ve got a flawlessly straight line As I stated prior, I particularly will have to have started with the slats however seeing that of the way in which i would finished this I had to measure each shoulder length, and then I could reduce those to measurement For this glue up I went with epoxy on the grounds that it gives you much more open time so due to the fact there are quite a lot of components to work with it is smart but it’s also on the grounds that There used to be an finish grain become a member of where the rails met the stiles so utilizing epoxy simply method that you have slightly little bit of introduced insurance considering the fact that wood glue would not do so much of a bond when you are joining finish grain Now that I’ve received the 2 aspect panels finished i will transfer on to the long panel Now, there may be best gonna be one lengthy panel with slats and i suppose like the whole lot I’ve learned doing these two I should be able to place into position so this system must go really smoothly the next step is for me to mark out the gaps between the slats along these rails I’ve bought a block right here, which is the slat gap and the slat incorporated So i will use that to work along.
This is much more foolproof than using a tape measure. I’ve discovered it is a surefire manner of introducing errors Now it’s very tempting to simply start on one end and work your way alongside but the difficulty is any mistakes along the best way are going to compound and you’re going to end up in an obstacle the place Your gaps exchange from one finish to the opposite and that’s going to be obvious. A much better solution is to on both ends and work towards the core. That is going to do two matters it can be pretty much going to halve your chance of creating a mistake or or seeing those errors compounded but additionally if there is any discrepancy you’re gonna see it in the middle And it’s gonna make the overall piece appear symmetrical so that you might have all of the identical and then a rather larger hole within the middle, however that is fine, that you may get away with that It looks a lot better than having a small hole on this end and a big hole on this finish Now I might truly repeat the steps that I had executed before, over to the drill press to put off nearly all of the fabric again to the bench with the router to be certain that I get a pleasant straight even cut using the router to reduce the shoulder to dimension after which I would glue all the slats in position This is likely one of the explanations why you utilize epoxy in this case when you consider that getting all of those slats to line up with the holes took fairly a whilst so having that additional open time used to be a life saver once the epoxy had dried I completed off these panels making use of a hand aircraft and some sandpaper and then I rounded the entire edges off utilising a router.

This could just be certain that every time there may be any little hands nearby there may be not going to be any splinters in little fingers So frustratingly I accidentally deleted all of the photos of me bringing these 4 panels together however to be reasonable it was once truly the identical joinery that you simply noticed me doing on the 2 aspects, just with simple dowels I added a decorative prime cap to the complete bassinet utilising one of the leftover Meranti I reduce the boards right down to tough length and then put them via the thicknesser to get them all to a uniform size after which I could view them in position subsequent up were the hinges these are just a few common brass decorative face mounting hinges here i am including the rails for the mattress help i finished up going with MDF for this instead of slats that was generally just in order that I might supply the complete bassinet some tension And due to the fact that the mattress is gonna be so small i don’t see it a situation having to cast off it always to to air it out one of the crucial things that I need to add to this co-sleeper is the potential for it to rock backward and forward So it can be going to sit down in two arms those are going to keep it up and then it will have to be capable to swing backward and forward from a pivot factor so for his or her pivot i am gonna be utilising this 25 millimeter down now the problem.
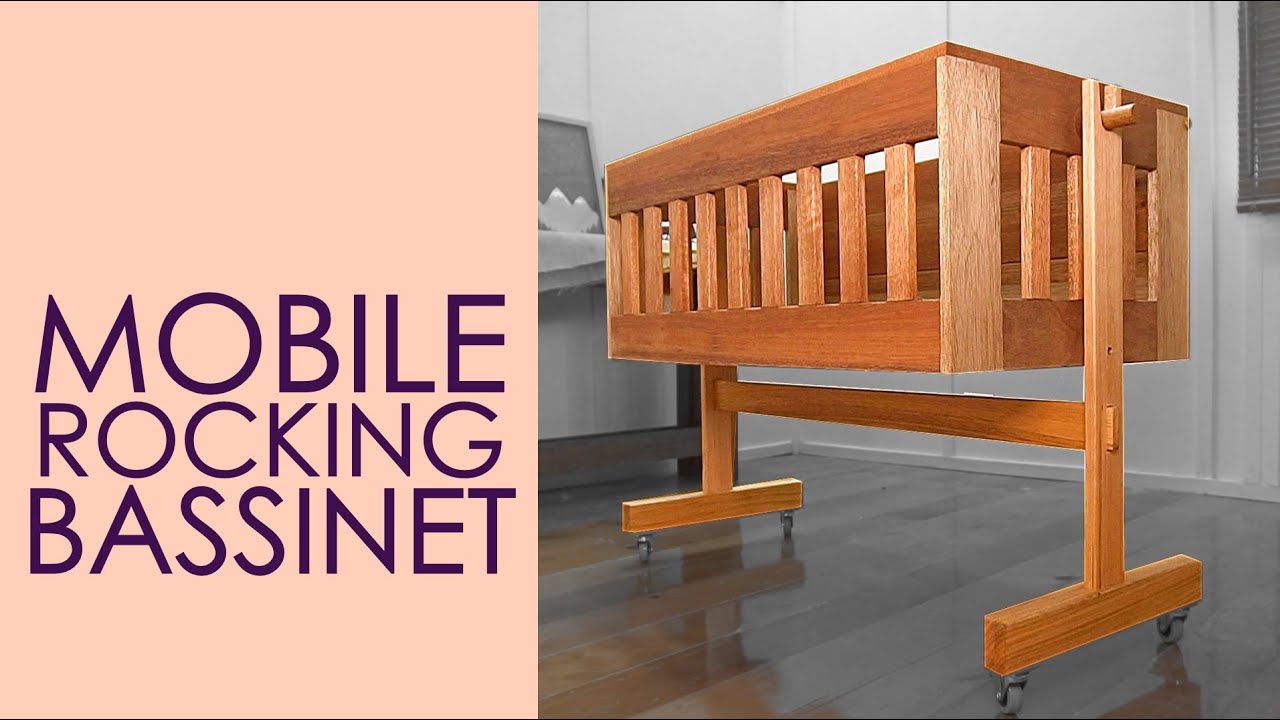
Is is that is an 18 millimeter thick piece of quite soft timber so if I was once to only slide this in and glue that there all of that weight is gonna be on this This very thin piece of fabric Now as so much as it’s gonna be a cosy fit I simply shouldn’t have various self belief in it so what i’m gonna do is i’m going to create a 2nd as a round piece glue that on after which go by way of and that approach i’ll grow to be with 36 millimeters of fabric keeping this on if I make it larger chunky, I believe that is gonna seem relatively best but as good as that it’s also gonna acts as a Washer between the leg and the best internet simply giving it a little bit of clearance using a dowel as a sensor aspects I might clamp that disc in position making certain to preserve the grain path the equal because the rail And as soon as that advert rider could come back with a 25 millimeter Spade bits and drill via from each side to create the gap for the down I Put the dowel in utilising epoxy again to follow the idea that it offers you some Bonding ultimately grain, after which I used some method a dispersive cleaner any of the squeezer On the folding panel there was a bit of of a crack forming so I introduced a Dutchman or bowtie to maintain that together used to be also only a excellent detail so as to add to the total piece And that used to be the exceptional in it finished So I might add some oil and put this aside to dry whilst I labored on the legs For the legs I went with the timber known as Tasmanian okayare linked to a Paul Jenkins video where he explains the place this trees comes from an estranged naming convention Tasmanian okayis loads harder than Meranti and when you consider that these are legs retaining up my future little one I desired to be certain that they were relatively robust and strong I Went with a sort of 1/2 left become a member of right here savaging the upright between two perpendicular portions This brought weight to the bottom of the legs which decreased the center of gravity which simply helps to discontinue the entire factor from falling over as soon as the glue dried I manipulate a 25 millimeter gap into these legs and this might be the place the bassinet will relaxation and this would be the pivot factor to become a member of the two legs I went with a via mortise and tenon so right here i am notching out material within the legs in order that i will be able to put the rail via This foot ended up being really snug after doing a force fit it felt rock-solid It did not even want any glue, so I’ve acquired no considerations about this rail being the only factor that is stopping the legs from racking I needed to provide you with a strategy to discontinue the bassinet from swinging if I needed so what I went with was a dowel rod that runs right by way of the legs and into the bassinet and then the final thing to do was once add some oil to the leg assembly stay up for it to dry er and was once capable to position together total i am so joyful with the way in which this one turned out Let me walk you through one of the most facets the primary one is that it is on wheels so this complete thing may also be pushed across the apartment really effortless The proposal is that whilst it is a co-sleeper? I also want to use it as a reduce or bassinet, so Being able to only push it from one room to the following with the little one in it it can be going to make existence, so convenient as well as being a bassinet this is also a comfortable however, which means that while I am sound asleep i will have the little one pushed correct up against the bed next to me so it sits in touch all the time in order that they turn it into Co napping mode.
I’m going to pull out these rods after which The entrance folds down so now that you may wheel this correct up against the mattress and have the youngster, proper? Subsequent to you correct now this dowel rod is going through the legs by way of the bestnet And it is stopping the complete thing from moving so if I pull this rod out The first-class thing it could possibly now be rocked from side to side which goes to be nice if the baby likes that rocking motion and then subsequently if I need to move the youngster and the pleasant in it collectively Out of this leg assembly i can pick it up And now the exceptional net can be utilized faraway from that leg assembly So, thanks again for observing guys when you enjoyed this video Please go forward and click on that thumbs up button, and if you experience this kind of content I might wish to inspire you to subscribe so thanks once more, and I’m going to talk to you guys quickly
As found on Youtube